
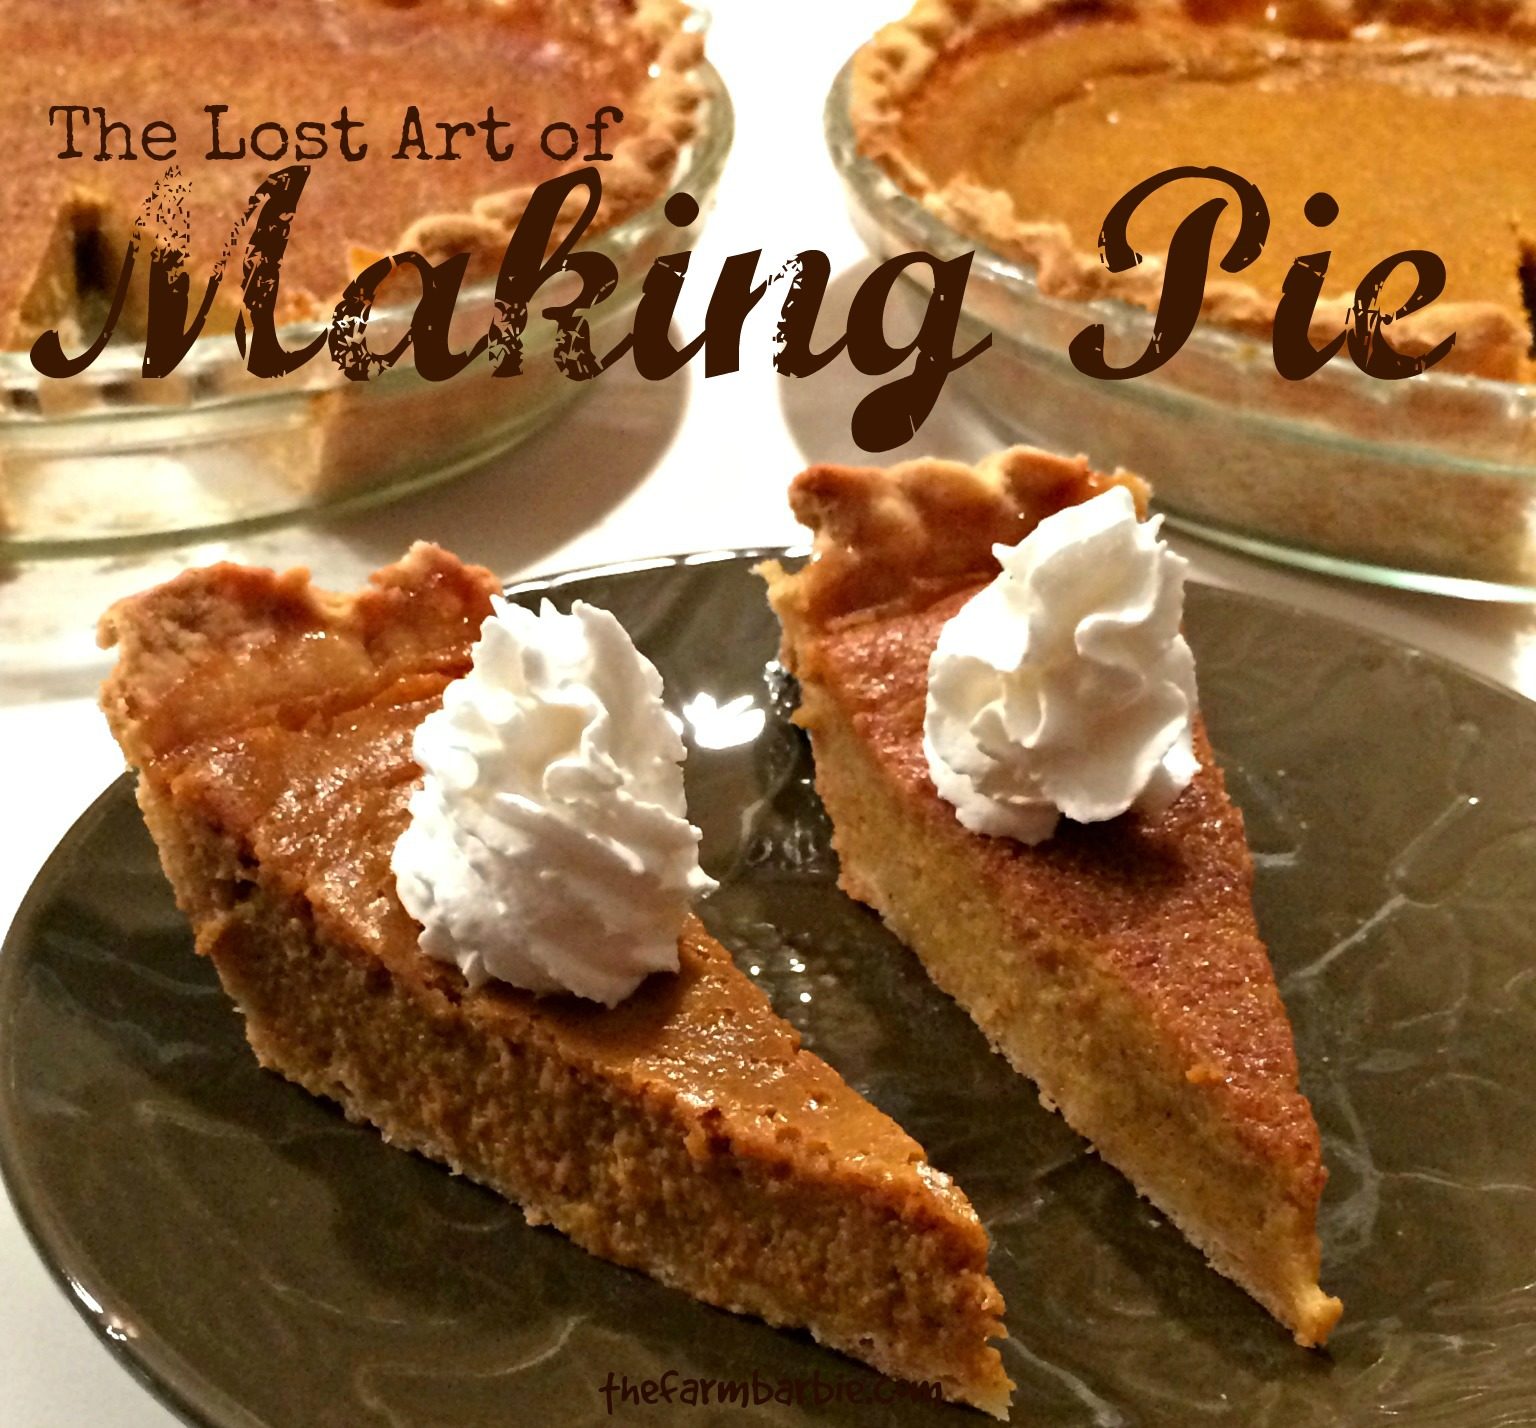
The lost art of making pie.
One Sunday after church Mamaw grabbed my hand and said, “Why don’t you come over one day and we’ll make pie.”
First, I thought her grammar was a little off…
Shouldn’t she have said, “Why don’t you come over one day and we’ll make a pie.”
Or
“Why don’t you come over and we’ll make pie crust.”
I really didn’t know what she meant.
Fast forward 8 years: Now I get it…
Out here in the country, folks “make pie.”
Of course, I said, “Yes!” to Mamaw’s invitation because:
- I love being with Mamaw
- Everything Mamaw makes is wonderful, especially her pies
- I didn’t know how to make pie from scratch
I had bought pre-made pie crust before.
I had carefully unrolled it and tucked it neatly into a pie pan.
I had filled those beautiful, perfectly round, flawless crusts with goodies and baked them to perfection.
But I had NEVER really made pie before in my life.
Welcome to The Lost Art of Making Pie.
If you have been unrolling premade pie crusts, filling them and calling them pies – Mamaw would tell you that you don’t know how to make pie.
I was at my Uncle’s house last summer. A nice [older] neighbor-lady came to visit and brought him an apple pie. It was flakey, bursting with apples and covered with caramel. It was a sight to behold.
My Uncle said that she brought him pies all the time – he loved her pies.
I asked her where she learned to make pie. She smiled and said, “It’s easy, anybody can.”
?Huh?
At this point I had been trying to make pie for a while and had a couple lessons in Mama’s kitchen. Maybe I’m slow, but after 2 private lessons, I was still perfecting my pie-crafting skills.
Then she went on, “I just pour the can of apple pie filling into the crust.”
What?!
Canned Filling?
Pre-made crust?
Here it was: the truth.
She was not making anything.
She was assembling.
No, she did not know how to make pie.
Her pies were imitation, food-like substances, full of preservatives, chemicals, and aluminum.
Uncle! Don’t eat the pie! It’s not food! It’s an impostor!
She’s a fake!
She’s a phony!
She doesn’t know how to make pie!
Mamaw taught me how to make pie.
I make all my pie crusts from scratch. They are real food. They are made with my hands. They are art. They are wonderful (most of the time).
The ingredients are:
- organic flour
- raw butter (can also use 1 cup butter & 1/2 cup coconut oil)
- salt
- raw apple cider vinegar
- eggs
- water
If you offered me $100 to eat a spoonful of Crisco or shortening, I would not do it. You can keep your $100 – I’m not eating it.
I don’t care what “they” say about flakey pie crusts and Crisco. I want to live. I choose butter!
Making pie crust is tricky.
I have not posted on making pie crust because I think it is hard to explain. Mamaw taught me how to make pie crust. It took me several lessons with Mamaw and lots of practicing and ruining pies before I really got the hang of it.
You will not have to ruin as many pies as I did, because I am going to show you how to do it!
Knowing if your pie crust is going to “roll” and if the finished product will be tender, buttery and flaky takes experience.
It takes good old-fashioned elbow grease.
It takes pies.
Lots of pies.
The first thing you must learn is how the pie dough should “feel.”
When Mamaw first began asking me to pinch the dough and tell her if I thought the dough would “roll,” I was bewildered. She would tell me to get my hands in it and see if it had the right, “feel.”
I thought she was crazy.
“Just give me a recipe. Write it down for me. Can’t I just take notes and repeat whatever you do?”
Nope. Not with pie.
Depending on the time of year, the temperature in your kitchen, humidity level and whatever else needs to be factored in, pie crust recipes must be tweaked so they will, “roll.”
If you have tried to make your own pie crust from scratch, you can probably relate.
I can’t tell you how many times I thought I had the crust dough exactly right and when I tried to “roll” it I realized that my dough was a mess. If it won’t “roll” you’re not eating pie.
I think that if you can successfully make pie you are a skilled baker.
Let’s make Pie!
Here’s the recipe – normally this would be at the end of my post, but I thought you may just want to work alongside me.
When making sweet pies I sometimes use 1 cup of butter and 1/2 cup of coconut oil – but only do this if you are making sweet pies. There is nothing nice about a chicken pot pie that tastes like coconuts.
- 3 Cups flour (to see why I use organic flour go here)
- 1 tsp salt
- 1 egg
- 1 Tbsp raw apple cider vinegar
- 5- 8 Tbsp Ice-water (not the cubes just really cold water)
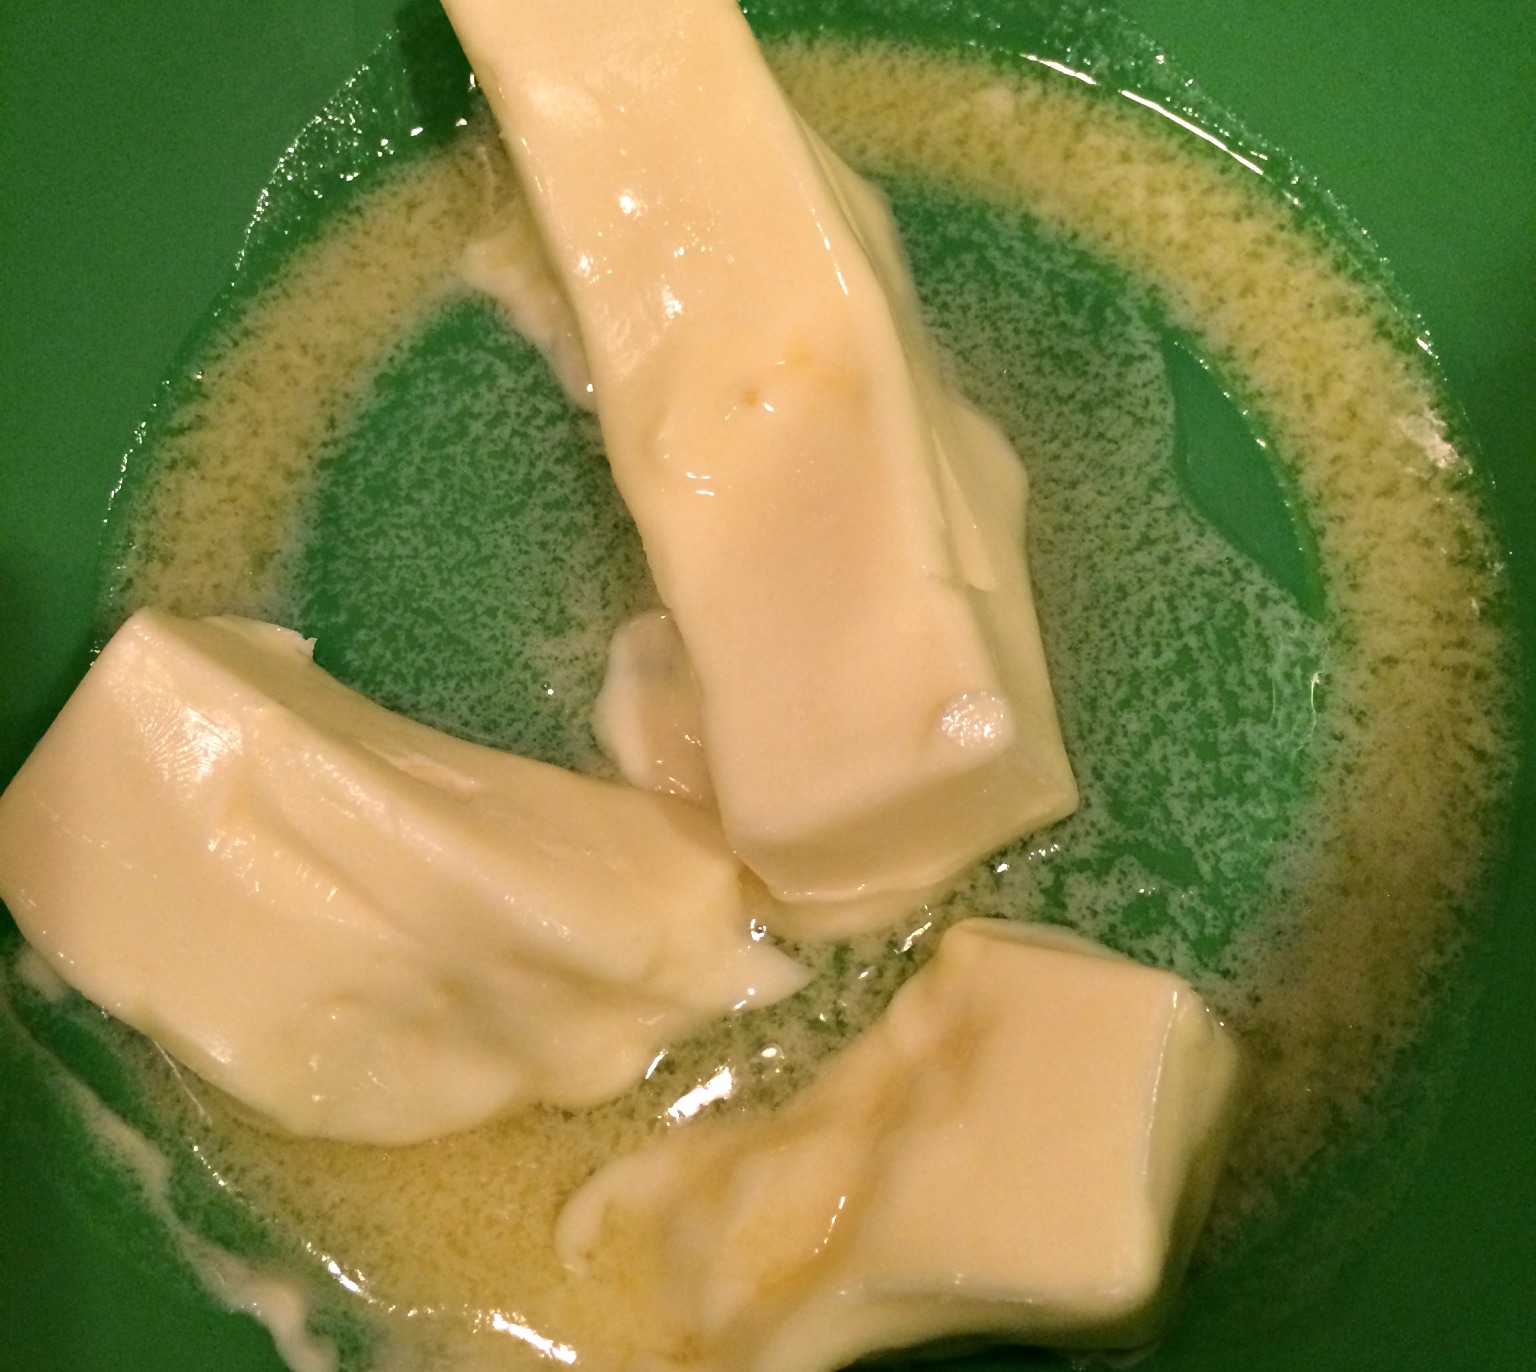
Begin by softening some butter. Do not melt it or you will have to stick it in your refrigerator and wait until it turns solid again. Just soften it a bit so you can smash some flour into it.
Next, dump the 3 cups of flour right on top of the butter & coconut oil mixture. Sprinkle the salt on top of the flour.

Now, grab the biggest fork you have ever seen. You could use a pastry cutter, but I don’t have one. Forks work just fine.
With your fork (or pastry cutter) begin working the flour into the fat. This will take a few minutes.

You will know it is done when everything is in tiny crumbles and there are no large chunks of fat left. It should look like flour covered bits of dough. If your bits of dough don’t look frosted in flour you can sprinkle a little more flour on them.
Do not over mix this. Once you have small bits covered in flour – STOP smashing, stirring, combining.
If your butter/ oil was too hot your end result will be a solid hunk of dough and no visible flour. This is not what you want.
We want pea (or smaller) granules of dough powdered in four.
Now that we have that, let’s add an egg.
Scramble an egg and pour it over your dough. Give it a slight stir (you will still see egg everywhere – just barely spread it around).
Next drizzle the tbsp of vinegar around the surface of your dough – again toss it just enough to get it to splash around. You can see the egg still not entirely mixed in. You don’t want to over mix.
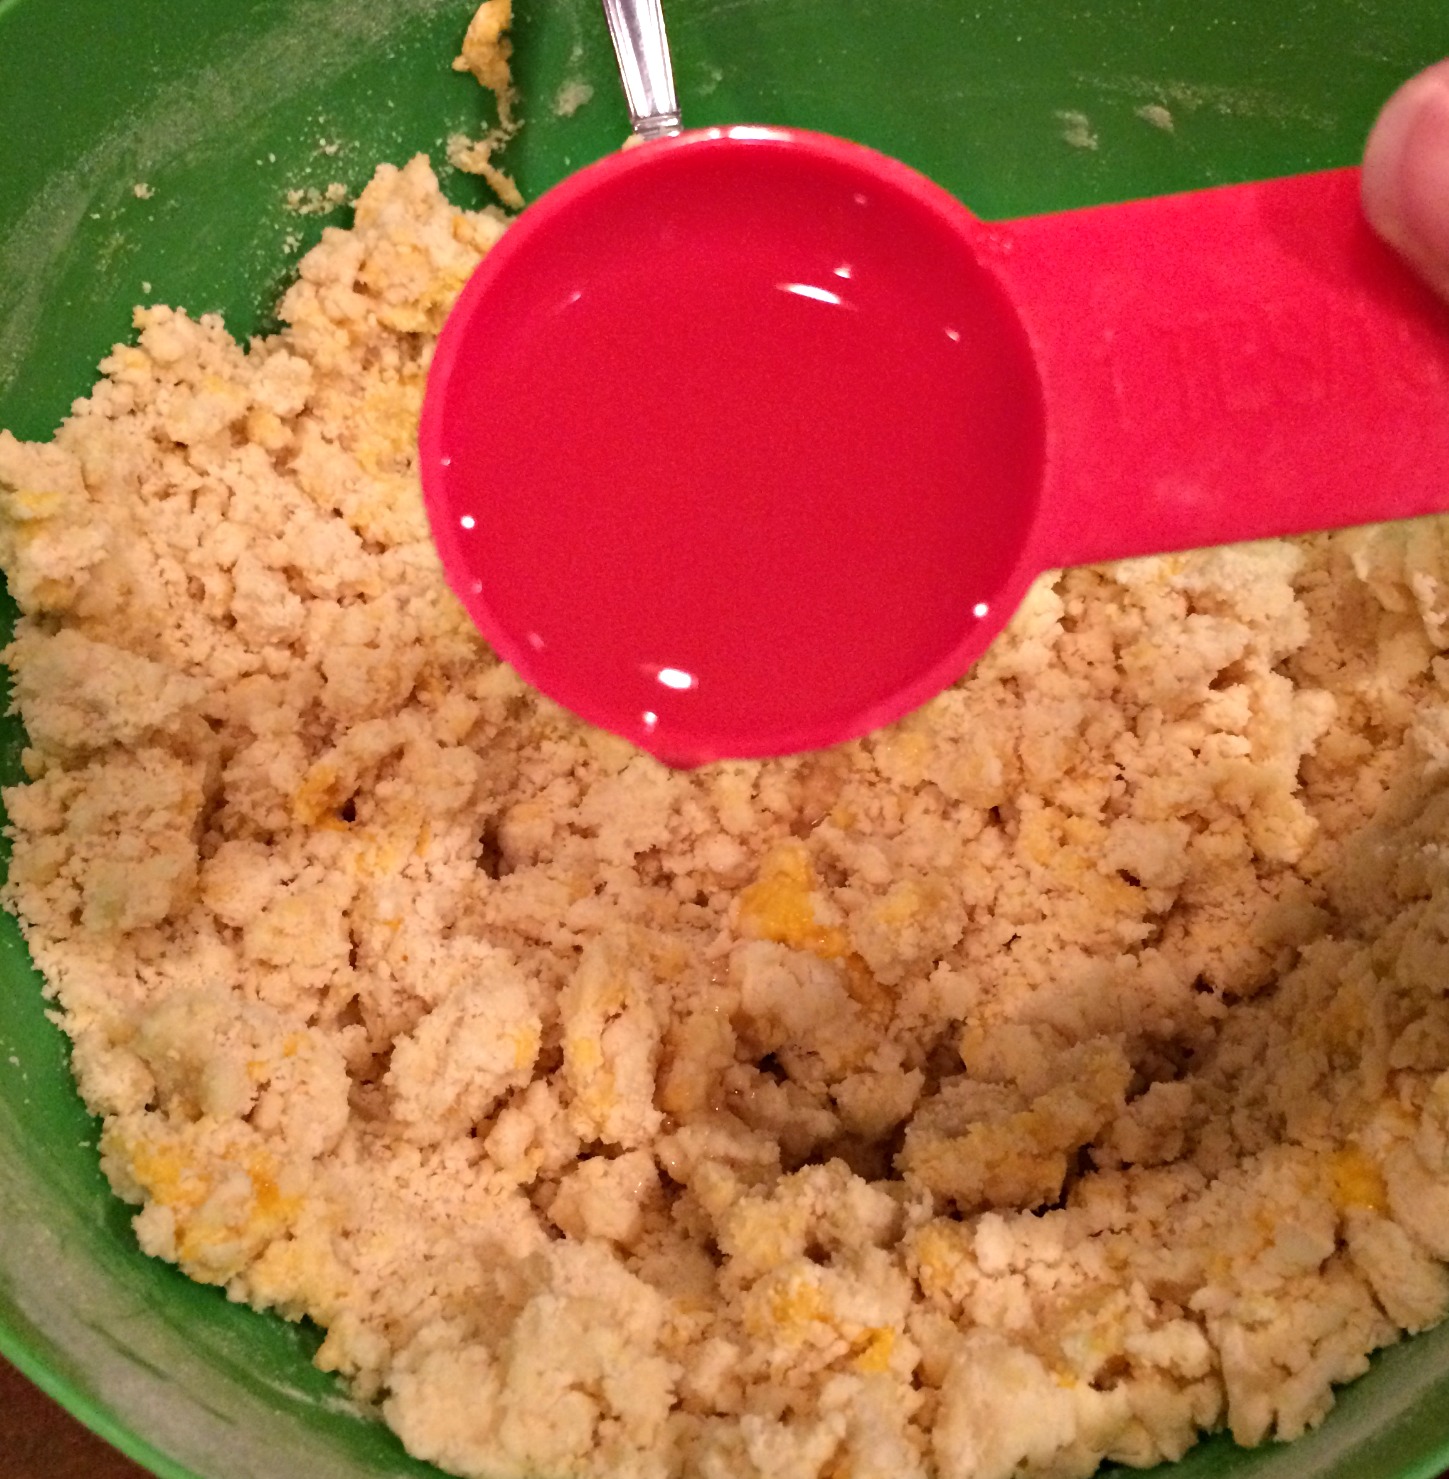
Last, fill a cup with ice water. Begin by adding 5 Tbsp of very, cold water to your dough.
Using your fork stir this. Here is what it will look like:
The powder that was covering the bits of fat is now gone. It absorbed the egg, vinegar, and water. You can see the dough is still not a solid mass, but the dry flour is gone.
You must touch the dough at this point to see if it will, “roll.”
It should be a bit sticky.
It should want to stay together.
As you mash bits together and pull on it it should stay together.
If it is falling apart, not staying unified and bits of your crust are falling onto the counter as you move it in your hands – IT WILL NOT ROLL.
It needs more water.
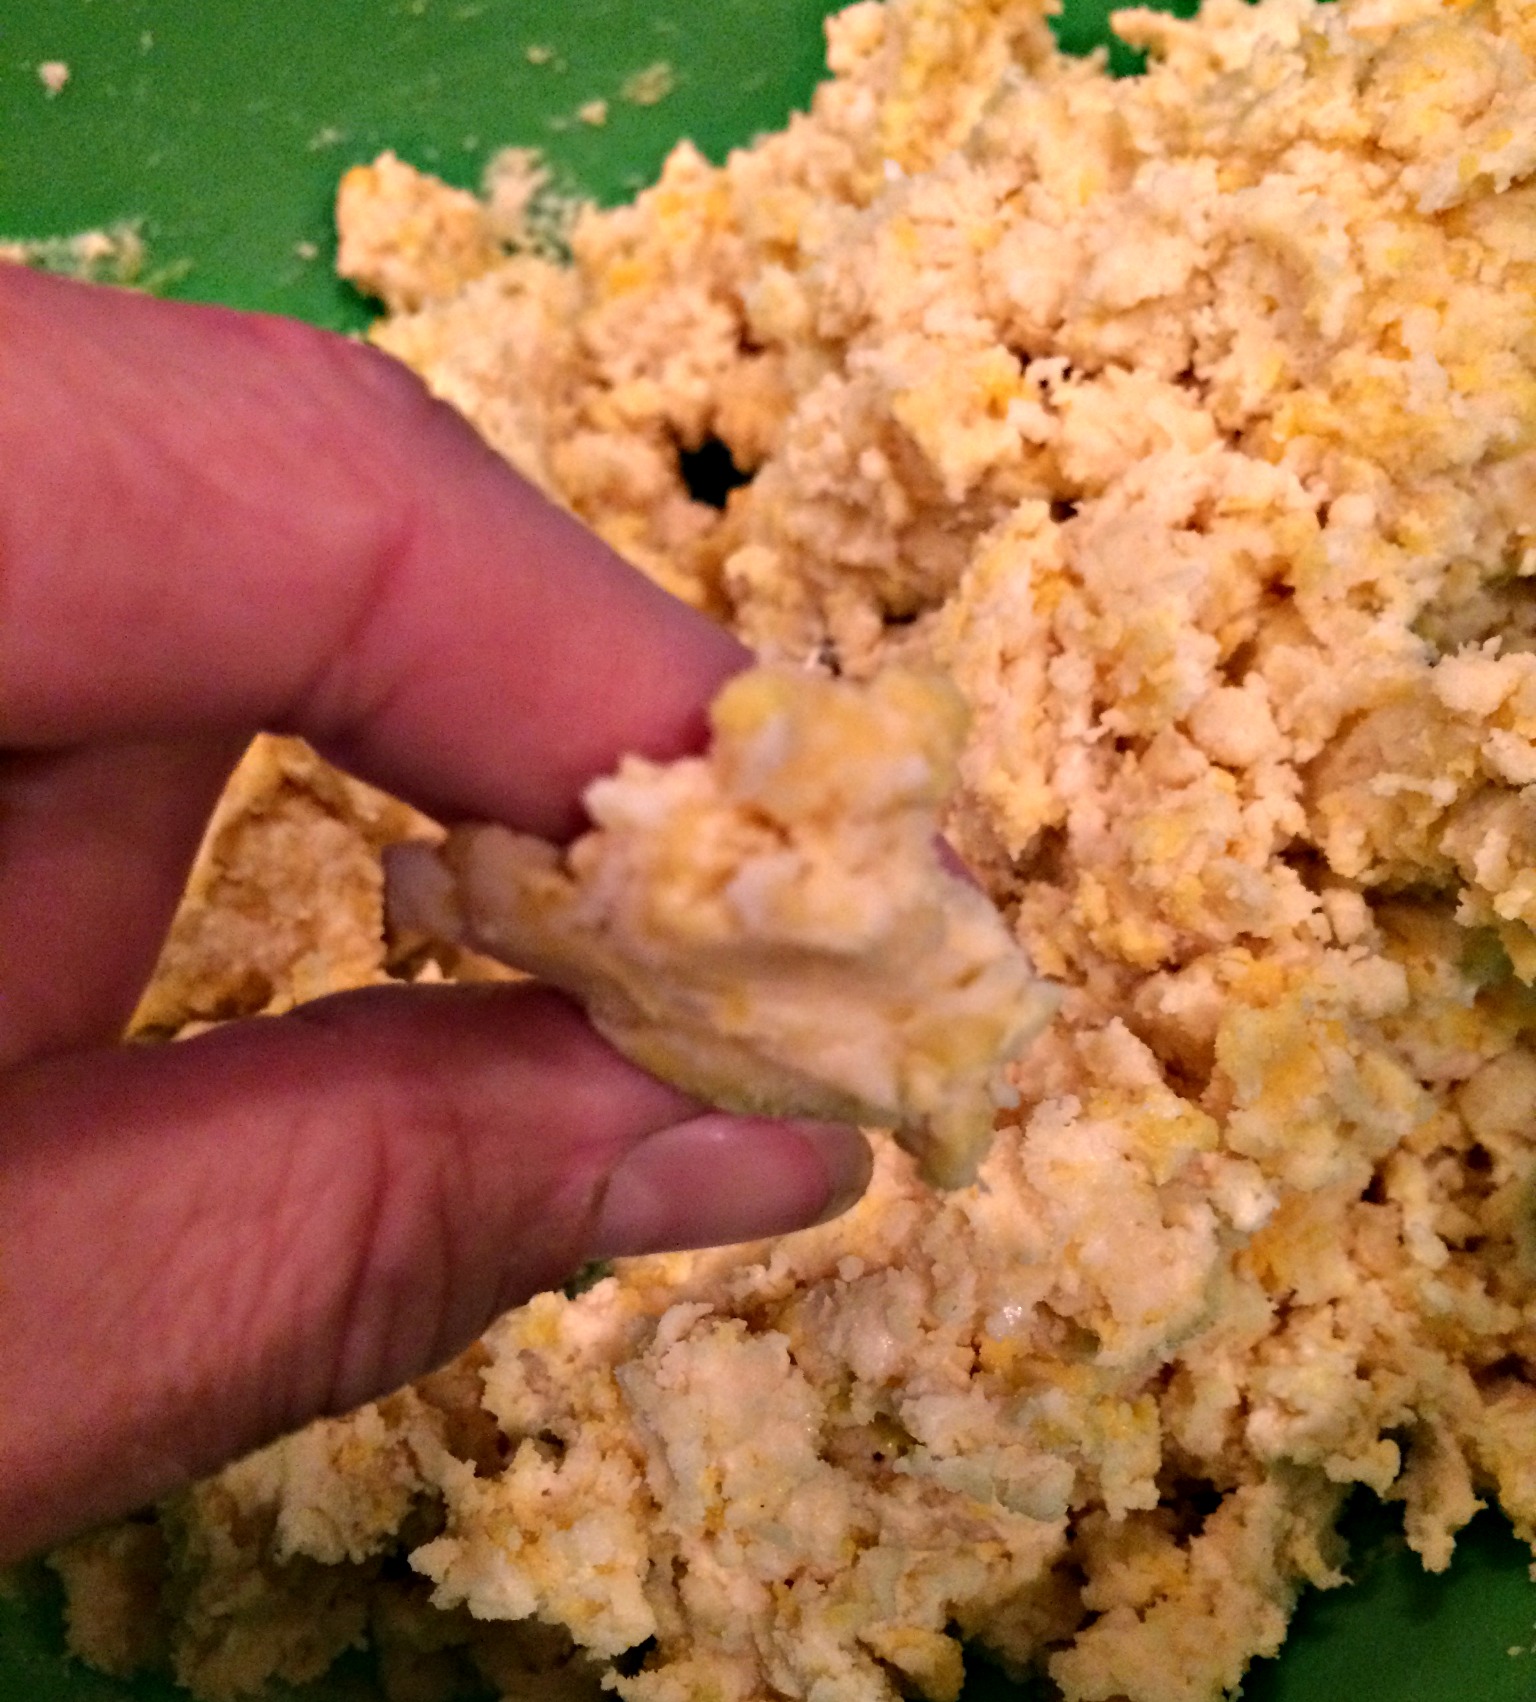
Add a couple more Tbsp ice-water and mix with the fork. Now grab some and see if it is holding together.
Yes!
This is what it will look like. There are bits of butter that is still solid. It is not one color, there are variations of lights and deeper colors. When this is rolled out and then baked it will become the flakey, buttery wonderful crust everyone wants. It’s those bits of fat that aren’t completely combined.
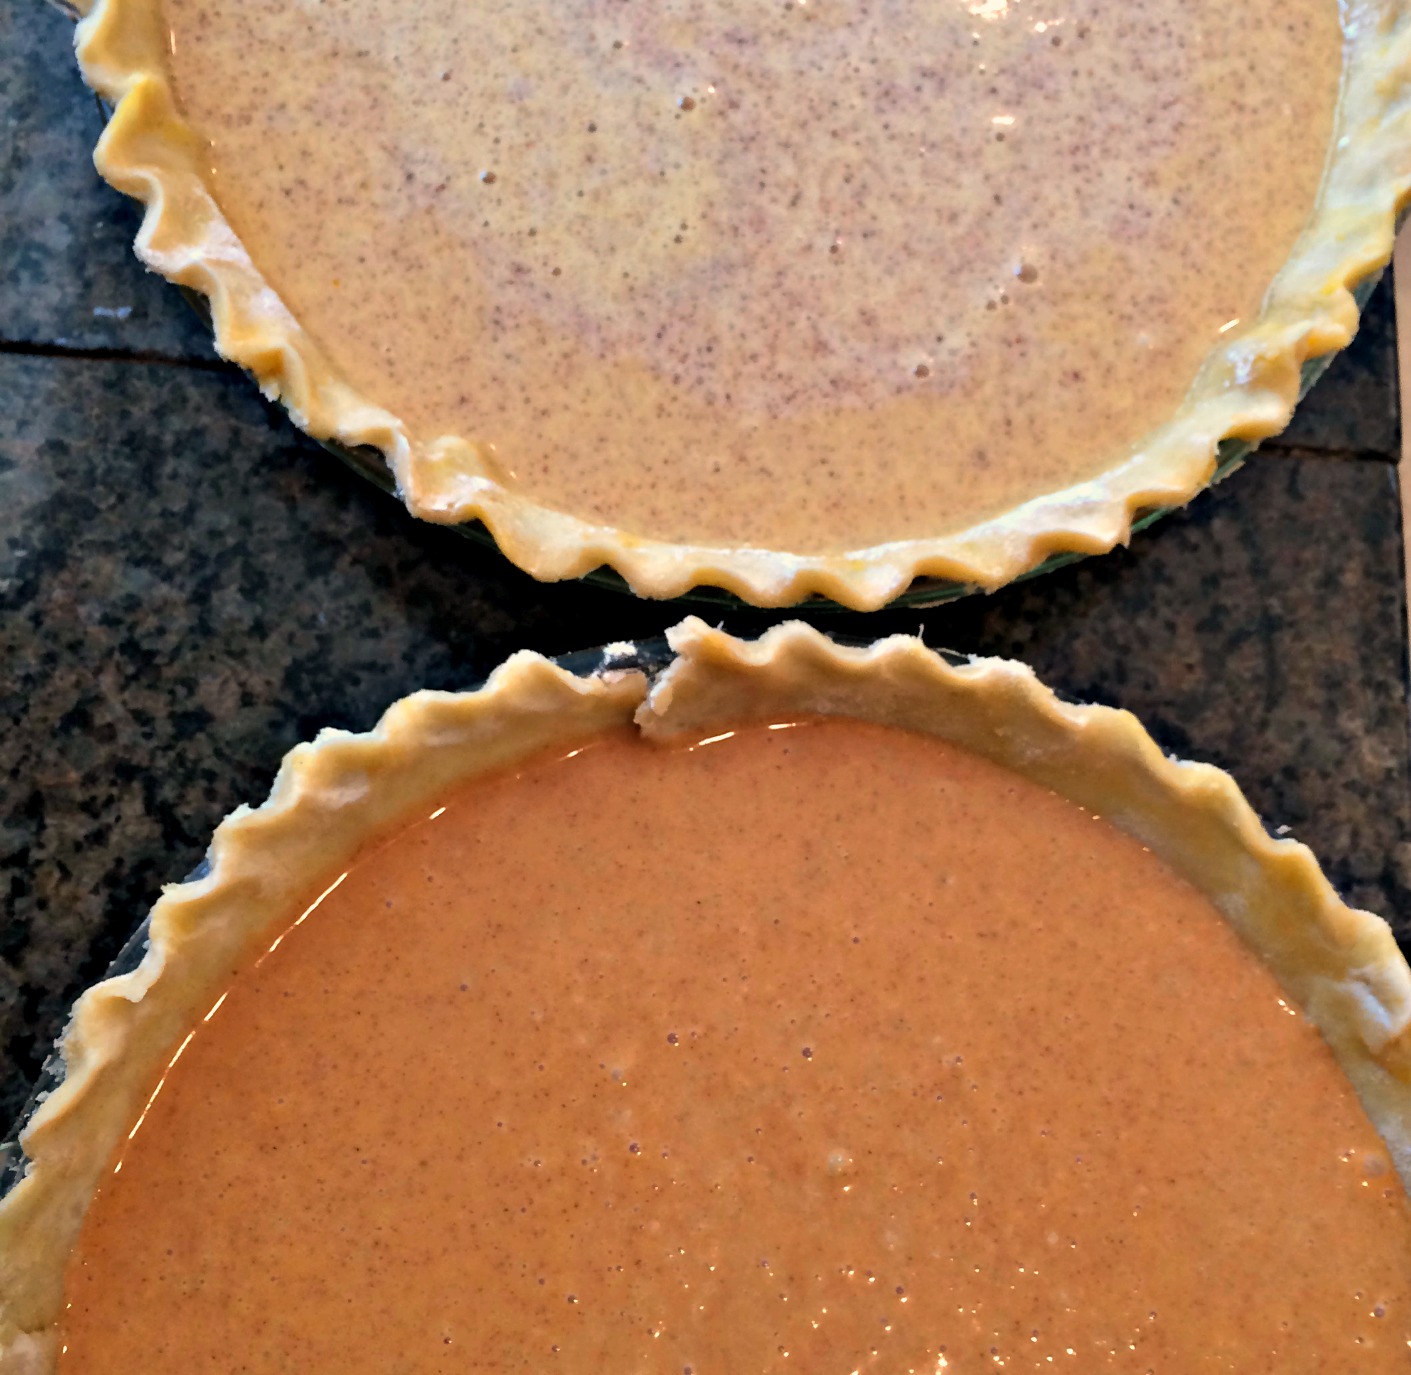
I want to add at this point you can freeze the dough (or just some of it) for later use. Pie crust dough freezes beautifully. Just divide the dough into 4 parts and wrap them in plastic wrap. If you are making a pie today – freeze what you don’t use. This recipe makes about 4 crusts.
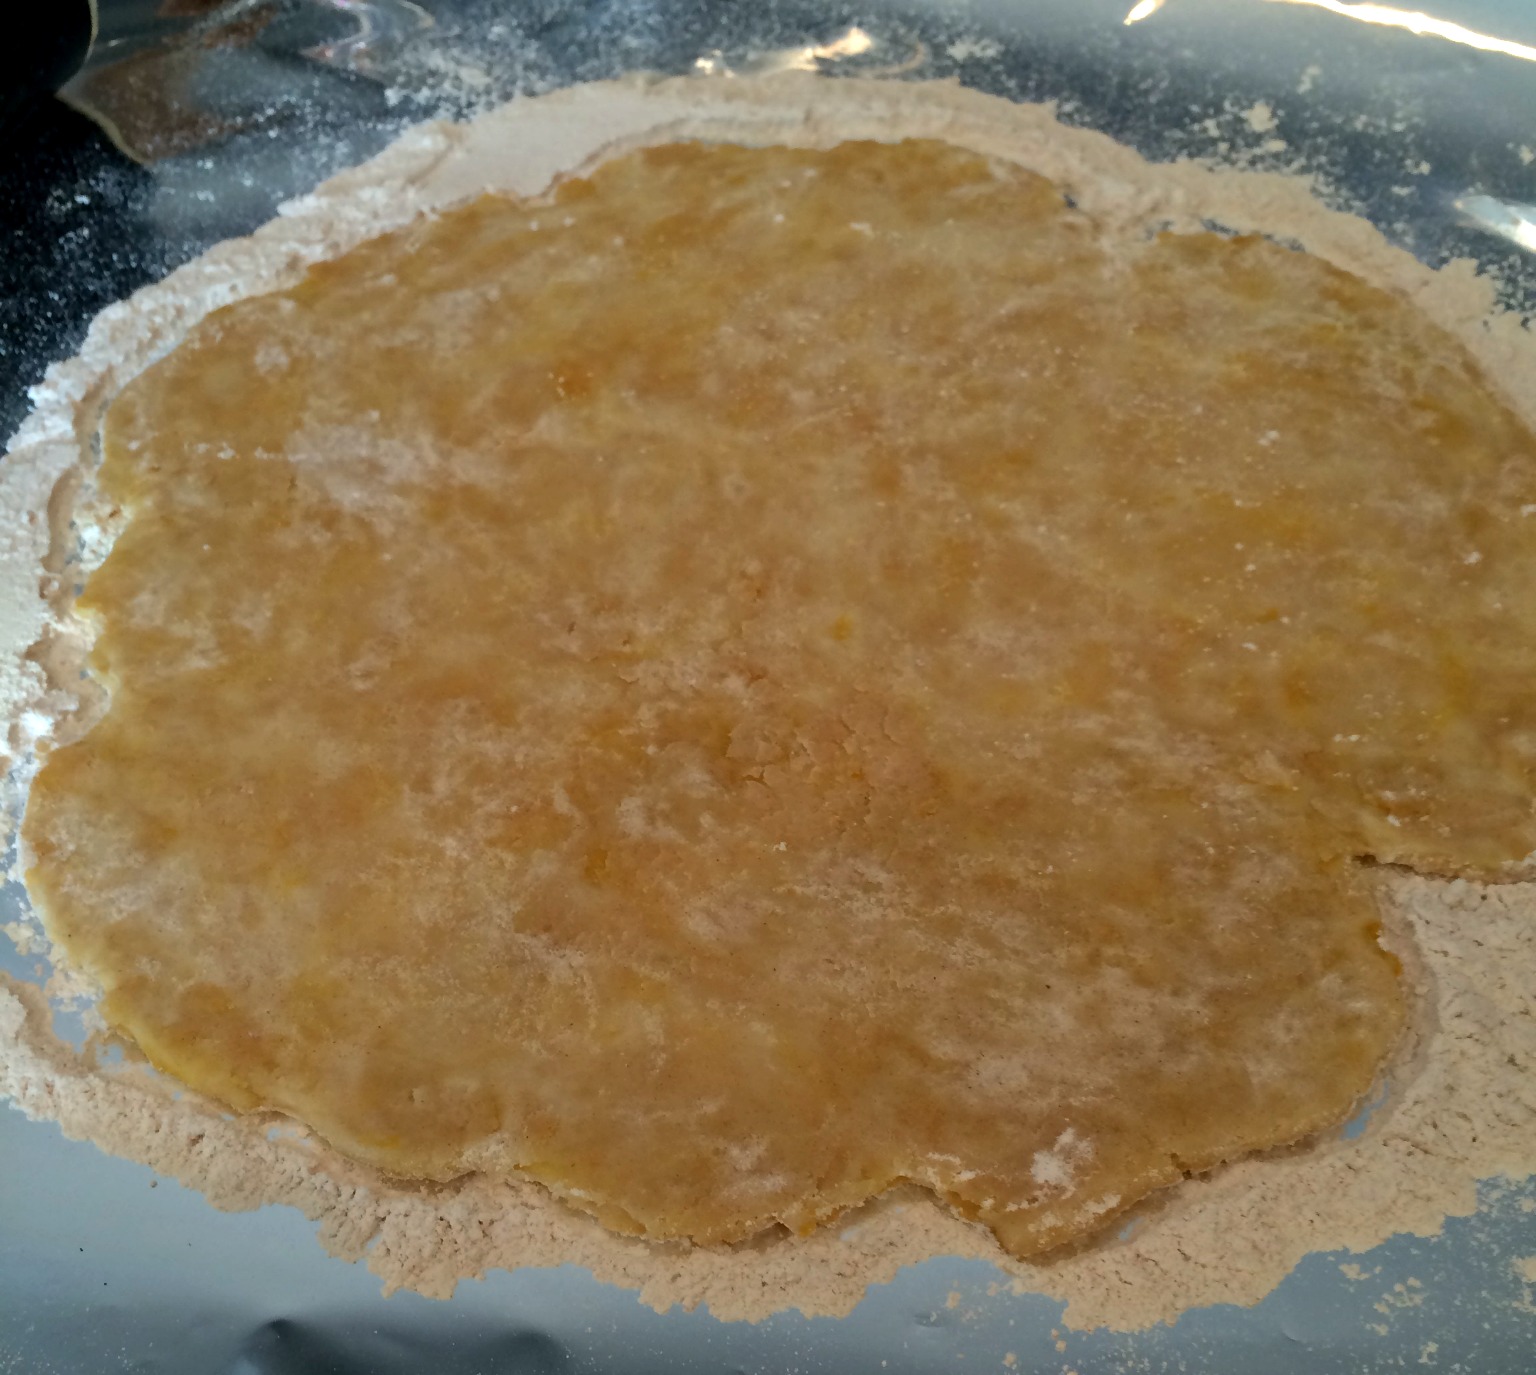
We are ready to roll out the dough.
Lay down a piece of wax paper, parchment paper or foil (if you don’t have wax or parchment). Generously sprinkle the foil with flour.
Shape a pie-sized portion (about 1/4 of the dough recipe) into a disk and cover the dough with flour (so it won’t stick to the rolling pin).
Roll out the dough!
If you are new to rolling out your own pie crust… Begin in the center and roll out toward the edges. Roll in each direction adjusting as needed to keep things circular.
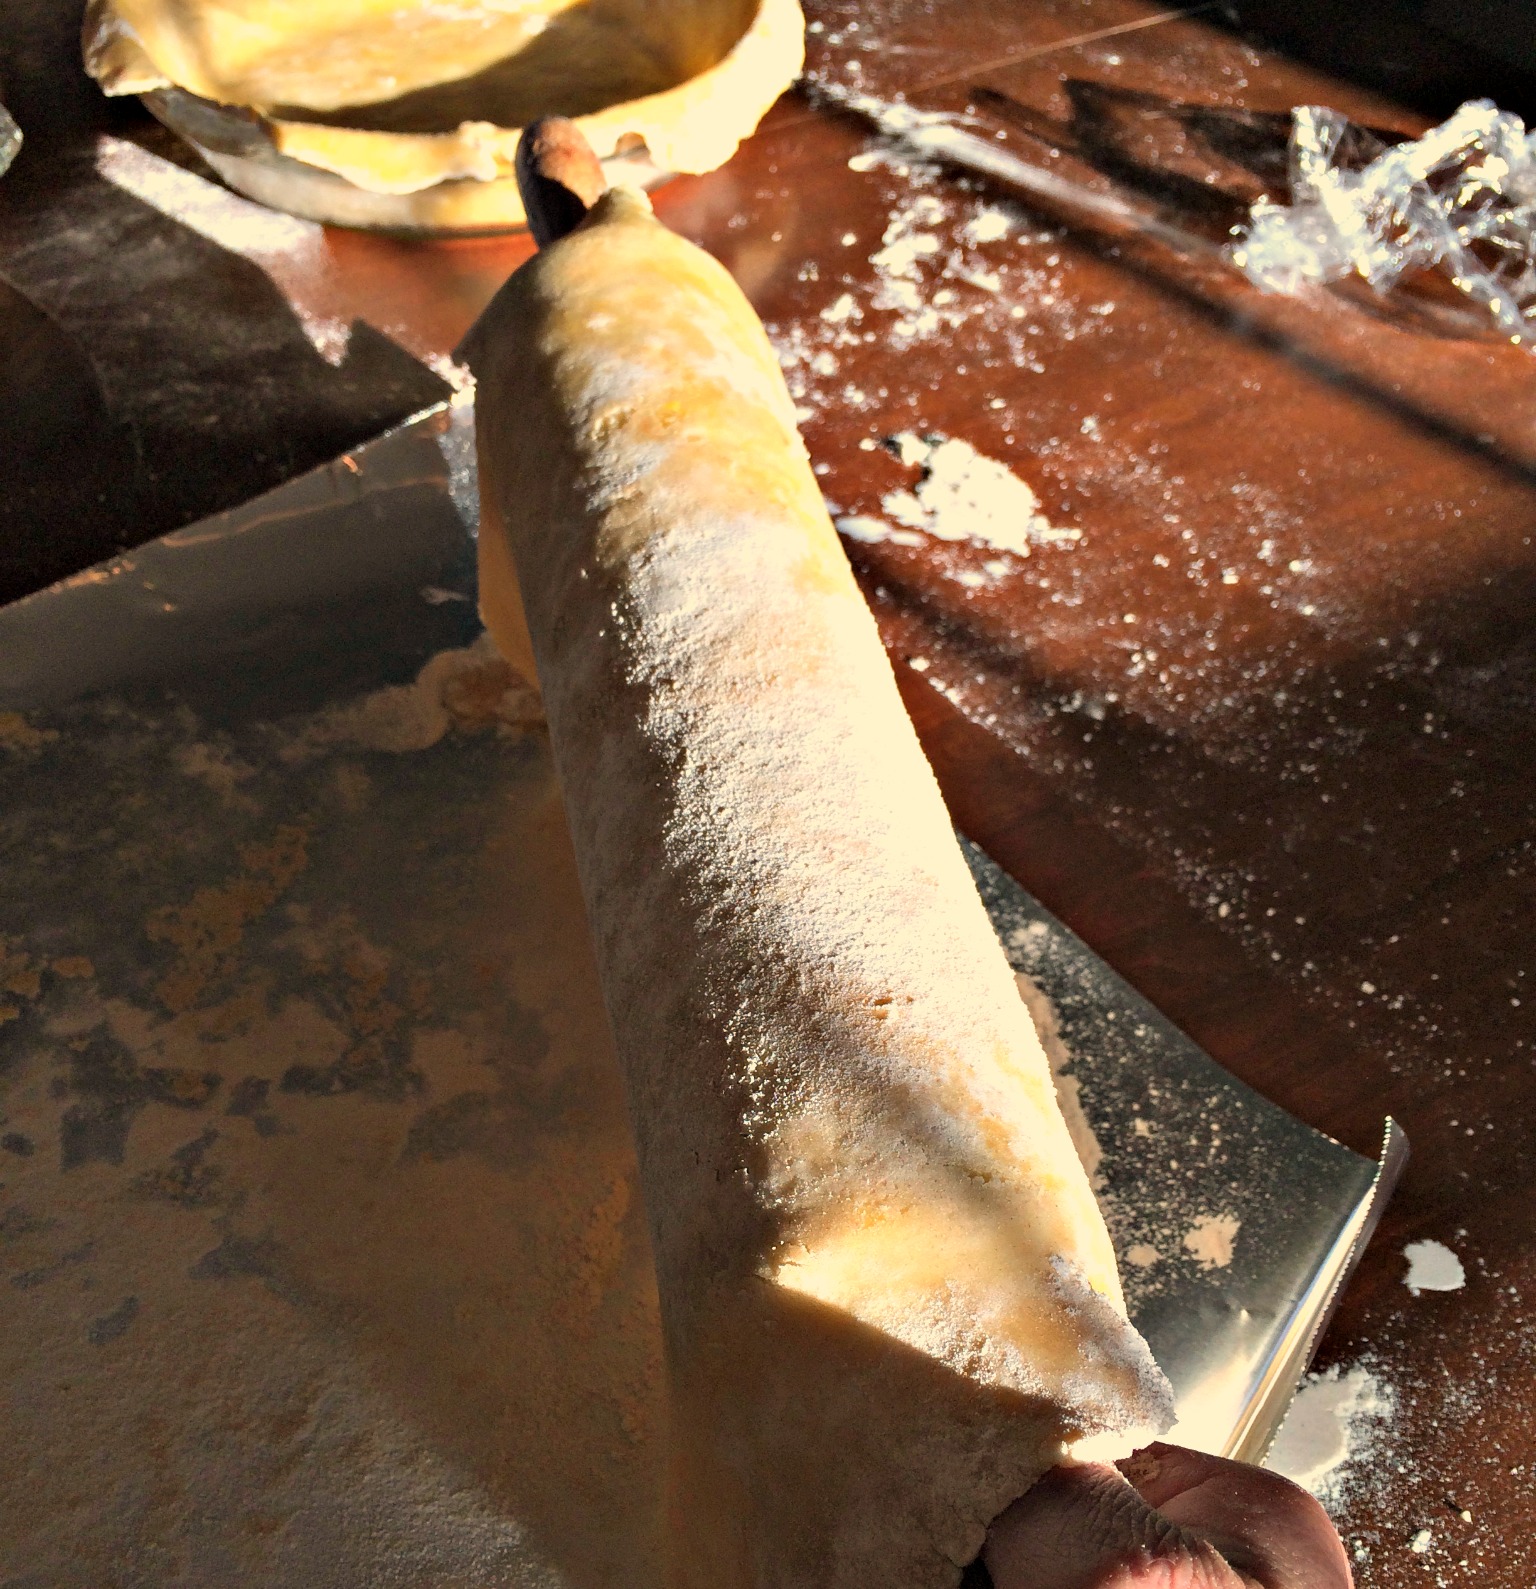
Once your pie crust circle is big enough to fill your pie pan and spill over the edges, it’s time to move it.
This is perhaps the part that gave me the panics until Mamaw showed me how to get a pie crust into a pie pan.
Hold your rolling pin above your pie crust as you lift your piece of foil (or wax or parchment) with your other hand. Gently raise the crust and lap it over the rolling pin. Turn the rolling pin to accept the crust. You will now have an entire pie crust laying over your rolling pin (pictured above).
Move this above your empty pie pan and unroll the crust right over the pan.
Amazing.
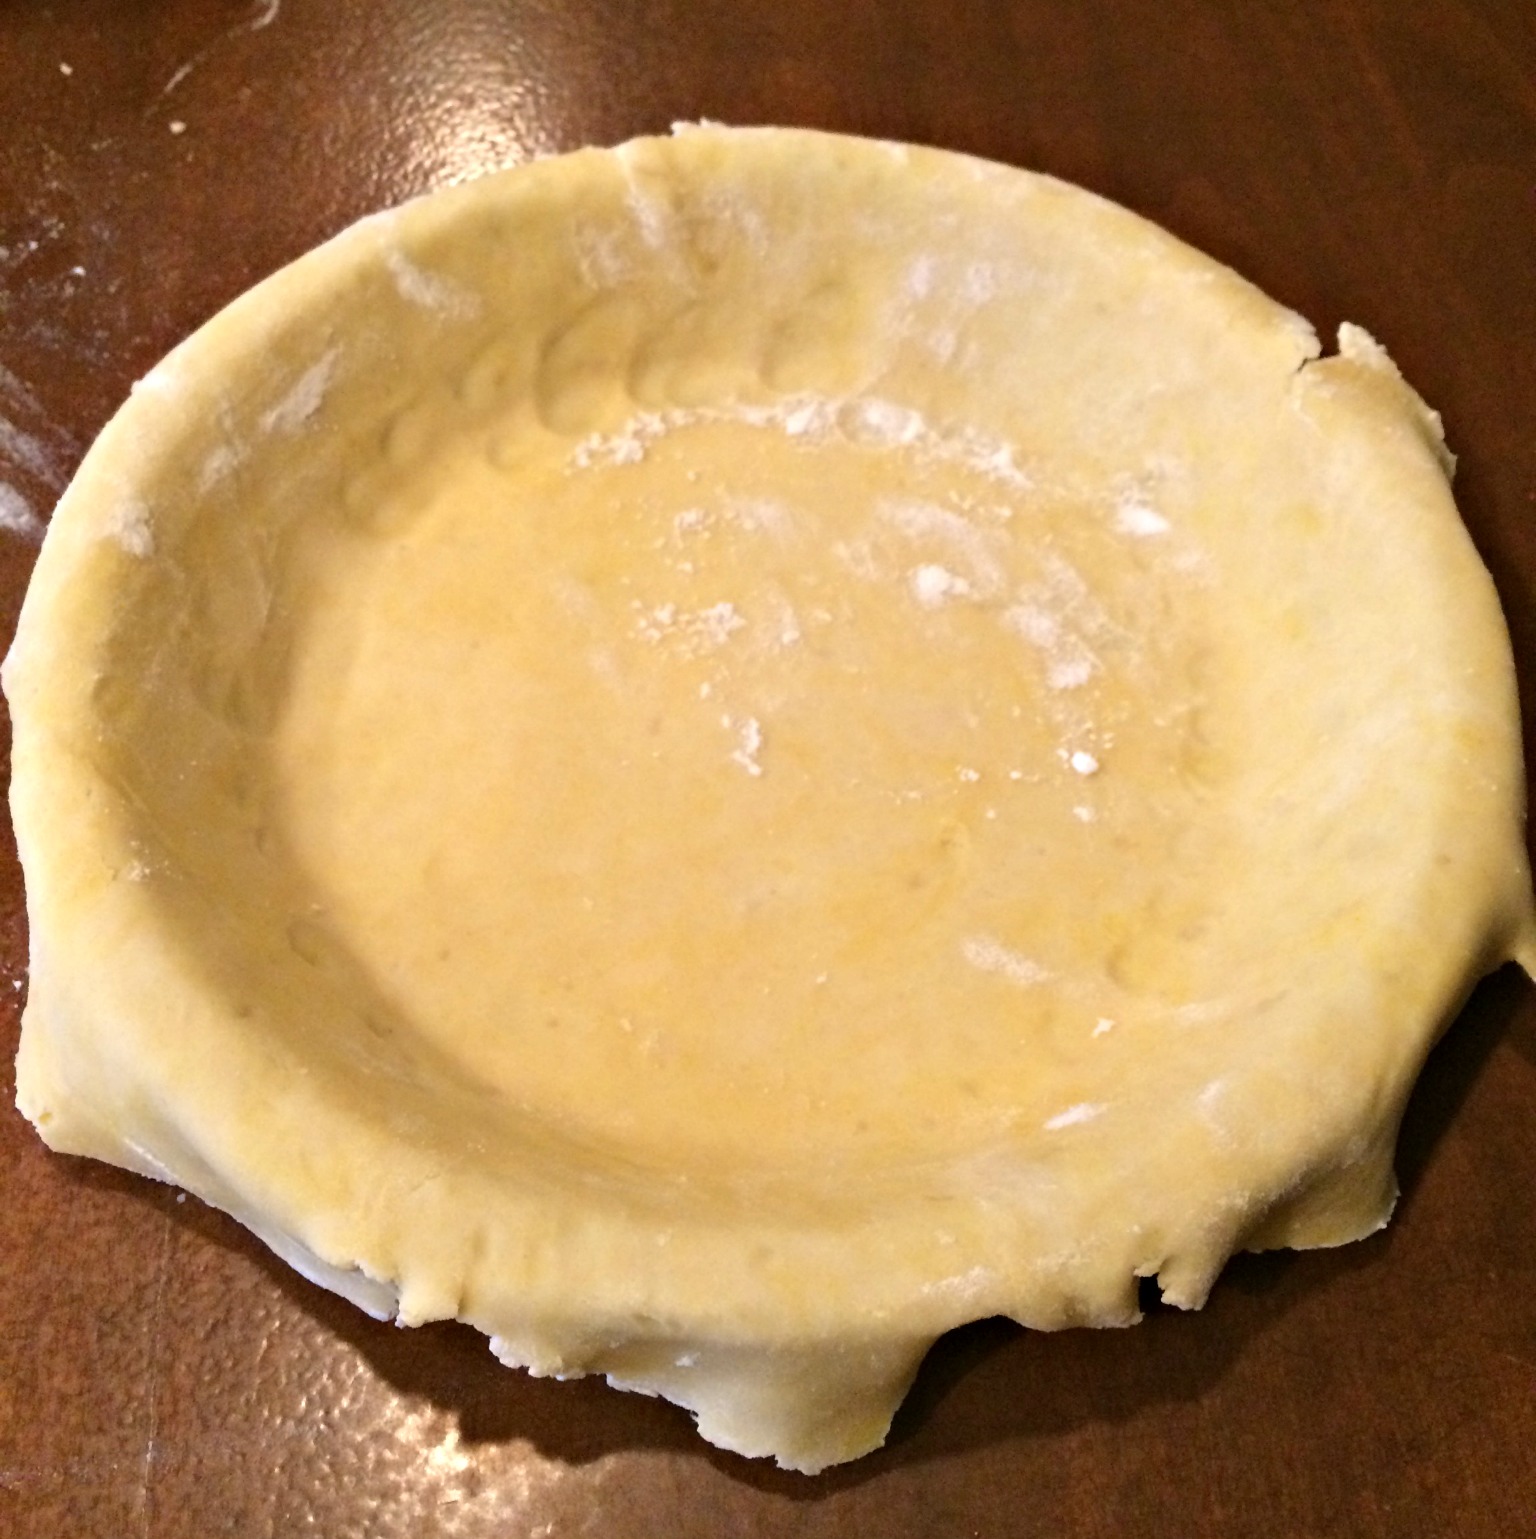
Adjust the pie crust as needed to center it. Use your fingers to gently push the crust into the bottom of the pan.
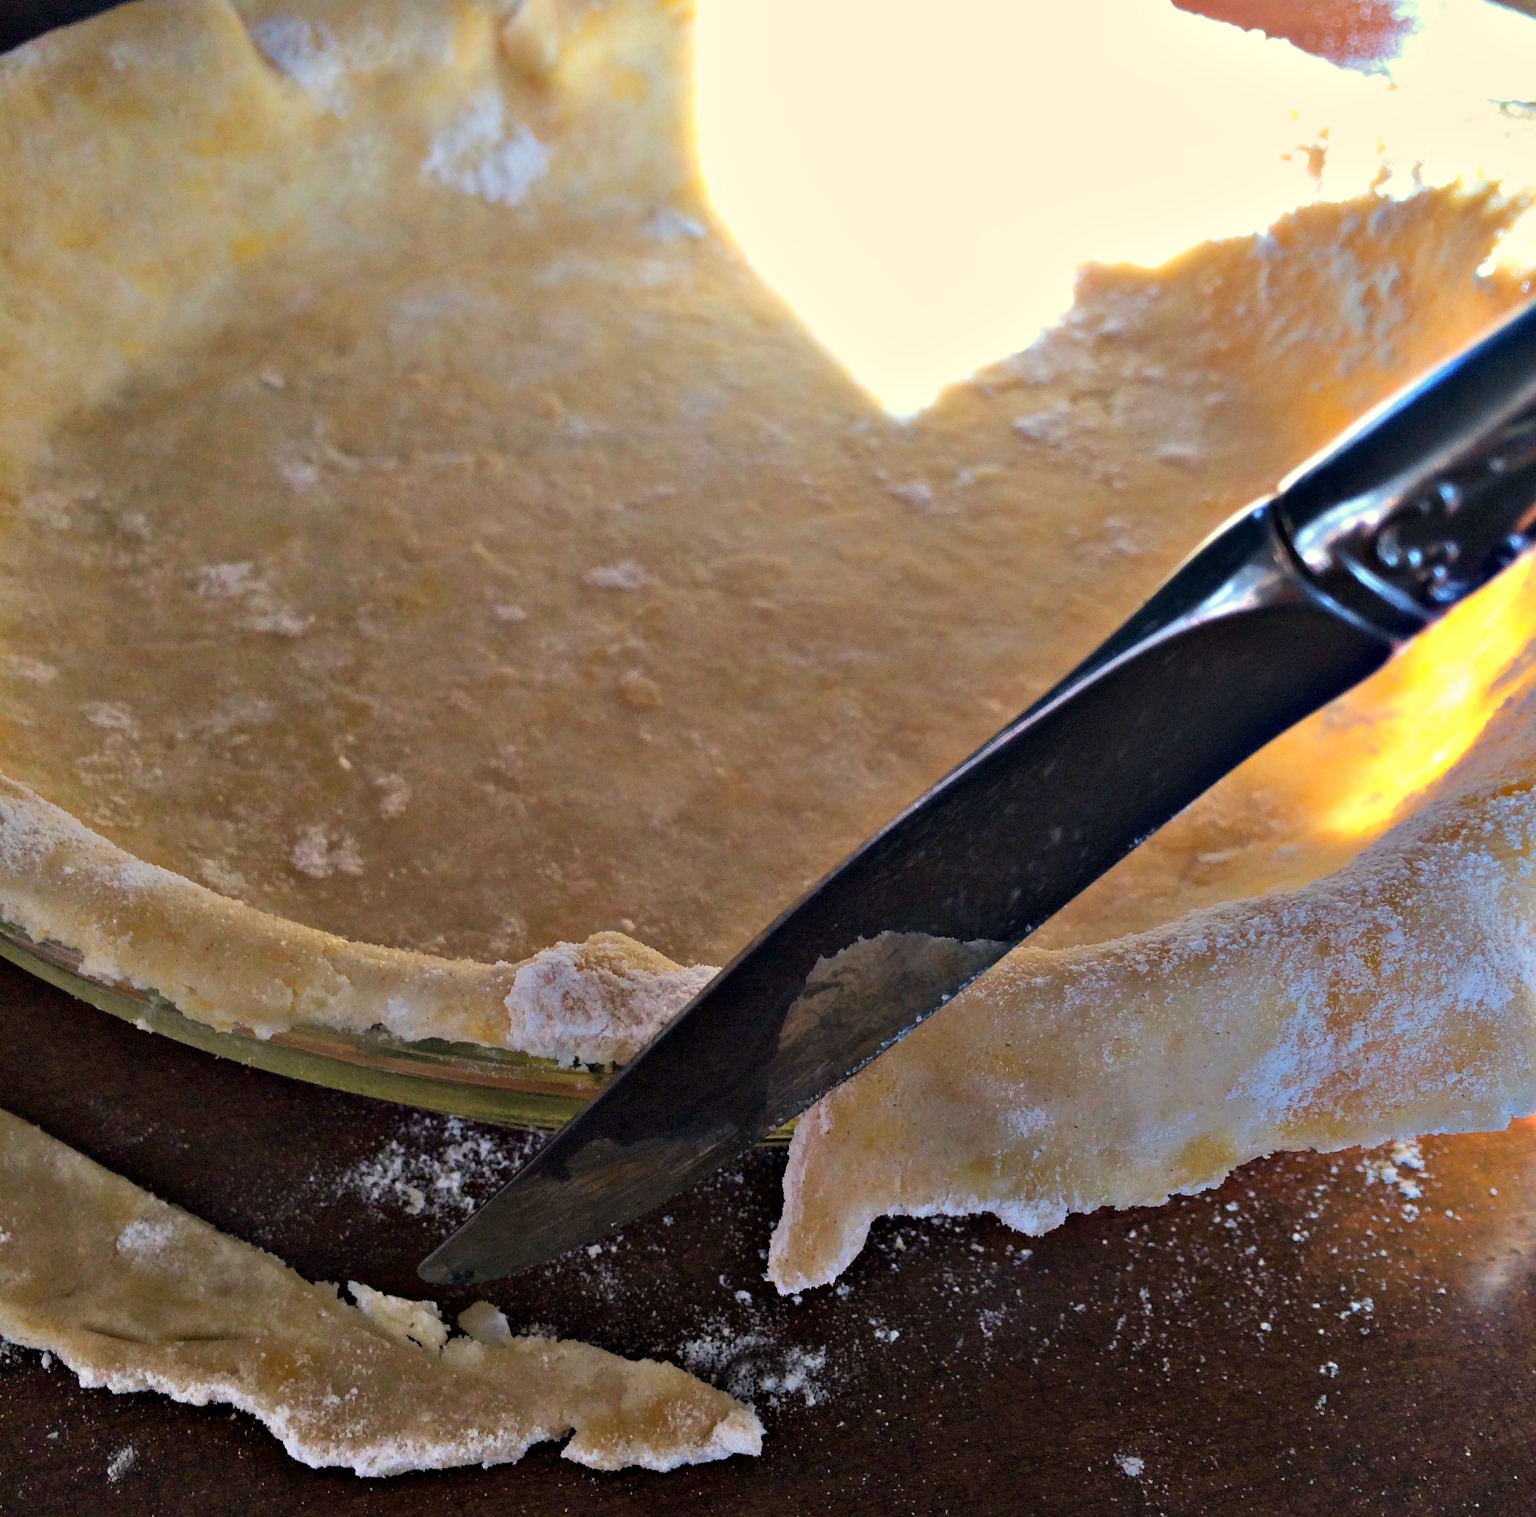
If I am making a 2 crust pie (a crust on bottom and top – like apple) I leave the edges as they are, fill it, add the second crust on top and then trim them both at the same time.
Trimming the crust is easy. For the cleanest edges use a sharp, kitchen knife. My youngest daughter is doing the trimming today, so I opted for a butter knife.
Once the edges are trimmed you can leave the edges as they are or crimp them for fun.
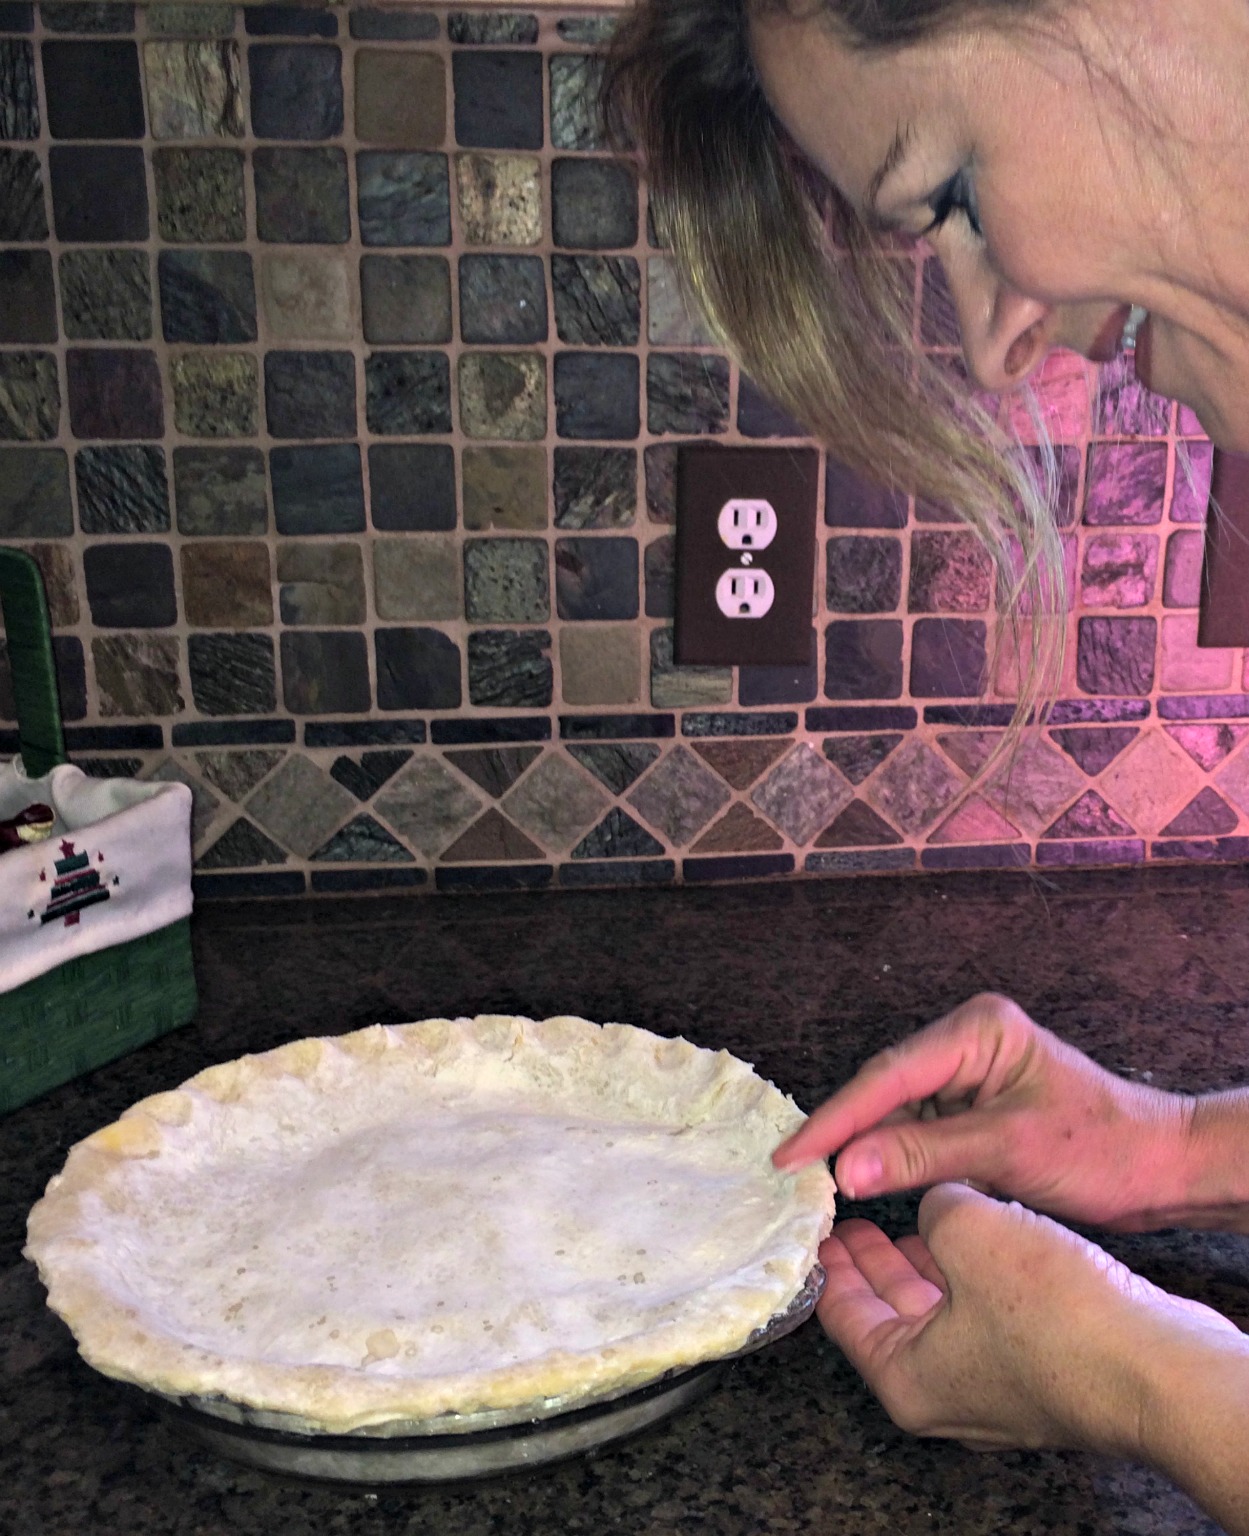
There are “crimpers” for sale. I just use my thumb and finger.
Homemade Piecrust. Make it. Fill it. Bake it.
Homemade pie crust freezes beautifully. Just shape into disks and wrap in plastic wrap. Anytime you want to make pie you can grab a crust (or 2) from the freezer.
To get old-fashioned recipes, farm tips and advice be sure to subscribe via email (here).
-Candi

Begin by softening some butter. Do not melt it – just soften it enough to work in the flour. Add 3 cups of flour right on top of the butter. Sprinkle the salt on top of the flour. Using a large fork or pastry cutter begin working the flour into the fat. This will take a few minutes.
You will know it is done when everything is in tiny crumbles and there are no large chunks of fat left. It should look like flour covered bits of dough. If your bits of dough don’t look frosted in flour you can sprinkle a little more flour on them. Do no over mix. Once you have small bits covered in flour – STOP smashing, stirring, combining.
Scramble an egg & pour it over your dough. Give it a slight stir (you will still see egg everywhere – just spread it around). Do not over mix. Add a tbsp of vinegar – again stir just enough to get it to splash around all the dough.
Last, use your giant fork (or pastry cutter) to stir in 5 Tbsp of very, cold water.
You must touch the dough at this point to see if it will, “roll.” As you pull on it it should stay together. If your pie crust dough is falling apart, not staying unified and bits of your crust are falling onto the counter as you move it in your hands – it needs more water. Continue adding ice water 1 tbsp at a time until your dough sticks together.
When it comes together, gently form into 3-4 disks (do not knead the dough, you want bits of fat and unevenness).
All that’s left to do is roll it out, fill it and bake!


incidentalfarmgirl
04/29/2016This is EXACTLY how I make my crust!!! My grandma’s recipe is the same as yours but uses Crisco so I use butter. You haven’t lived till you’ve had a homemade, hand picked from scratch blackberry pie!
Candi
11/08/2016Soooooo cool! Our grandmother’s generation sure knew how to cook!
-Candi
Amy
04/20/2019In your directions, it mentions butter and coconut oil, but coconut oil isn’t in your ingredients list. How much coconut oil do you add?
CJ
04/20/2019Great Question!!
Here is the deal –
1. You can use 1 1/2 cups butter and it will be perfect!
2. If you are running low on butter, you can substitute 1/2 cup coconut oil for 1/2 cup butter (so the recipe would have 1 cup butter & 1/2 cup coconut oil.
3. If you are making a savory pie (like chicken pot pie) stick with all butter.
XO,
Candi